Have you carved your pumpkin yet? Let’s roast some pumpkin seeds to make a night of it! When I was growing up, we carved our jack o’lanterns every year before Halloween, and my mom always roasted the seeds for a tasty snack. Pumpkin seeds are nutritious, too—they’re a great source of magnesium and plant-based protein.
Pumpkin carving night is still one of my favorite nights of the year, and now I carry on the tradition with my husband and a glass of wine. While I’m only a mediocre pumpkin carver, I’ve perfected my roasted pumpkin seed technique over the years. I’m sharing all of my tips with you today.
Roasting pumpkin seeds is really fun and easy when you know how to do it. When you don’t, you can make a big mess and end up with seeds that are either burnt, or never golden.
This foolproof recipe yields perfectly golden pumpkin seeds, every time! Keep reading to learn the easiest way to clean those slippery seeds.
Roasted Pumpkin Seed Tips & Tricks
These simple tips will yield delicious roasted pumpkin seeds with minimal fuss.
How to Remove Pumpkin Seeds
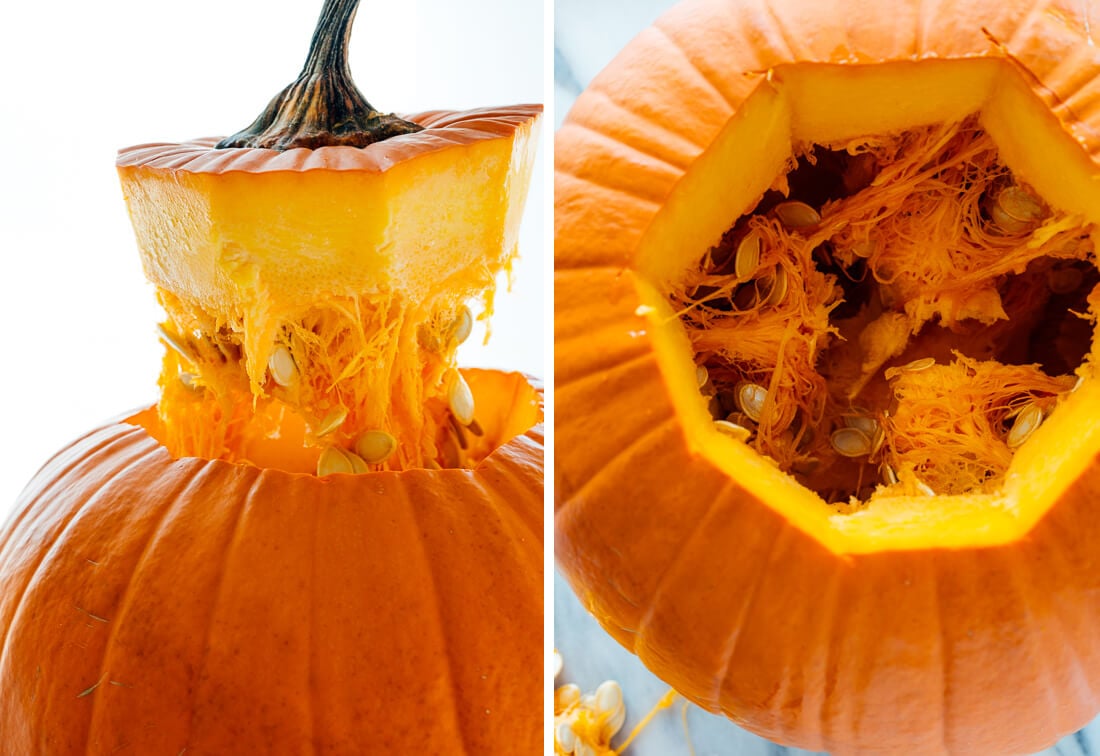
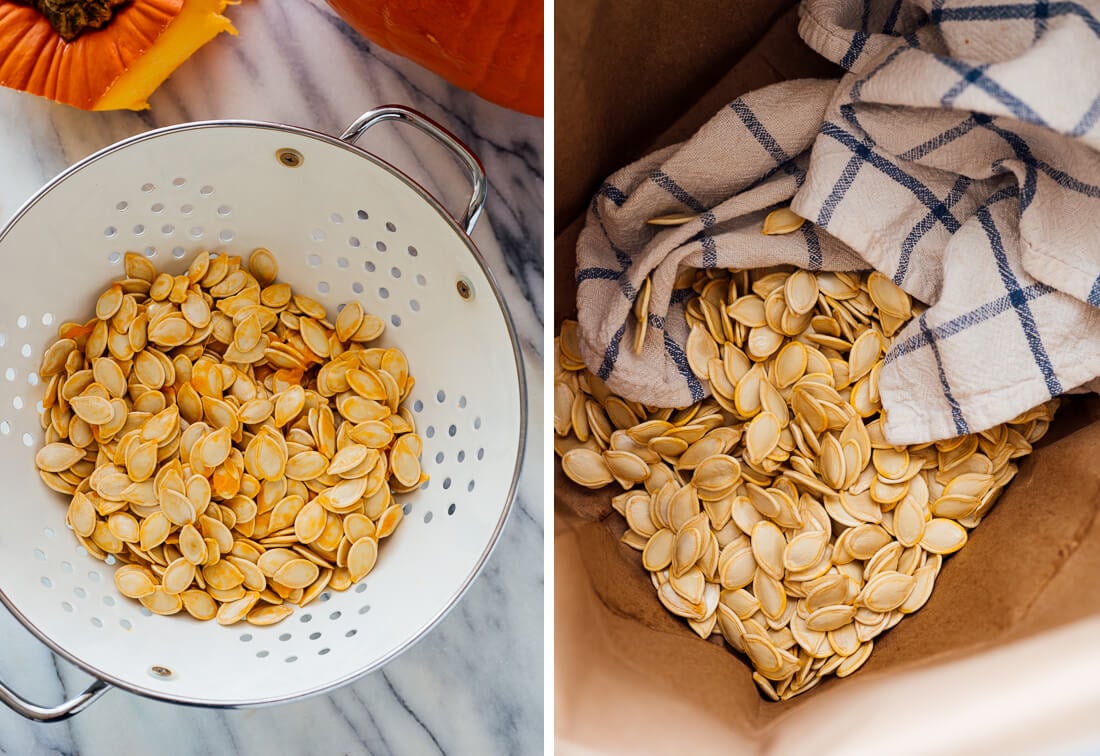
Use a sturdy, sharp knife to carefully remove the stem and surrounding area from the top of the pumpkin. Be careful and pay attention here! Then, use a large serving spoon or ice cream scooper to transfer the pumpkin seeds to a colander. Discard any large pieces of pumpkin.
If you have dry, sensitive skin, you may want to wear disposable gloves to protect your hands during this process. Pumpkin contains some naturally-occurring acids that can cause irritation (speaking from experience here!). That’s why you’ll find pumpkin in some natural exfoliating face masks.
How to Clean Your Pumpkin Seeds
I’ve tried several techniques, and here’s the easiest way. Run water over the seeds and swish them around, removing any obvious bits of pumpkin flesh along the way. Drain off the excess water.
Create a double layer of large paper grocery bags by placing one inside the other (if you don’t have bags, you could probably use a large bowl with a secure lid). Add the seeds and a clean, lint-free tea towel or several paper towels. Fold the bag to close and shake it all around! They should be dry enough at this point.
How to Roast Pumpkin Seeds
Spread the seeds onto a large, rimmed baking sheet lined with parchment paper for easy cleanup (it will also prevent the seeds from sticking to the pan if you choose to add any sweetener). Pour the seeds onto the pan and shake off any seeds stuck to the towels.
Toss the seeds with a few basic ingredients: Olive oil or butter, maple syrup or honey (optional, for some sweetness), and salt. We’ll wait to add any spices because they tend to burn in the oven.
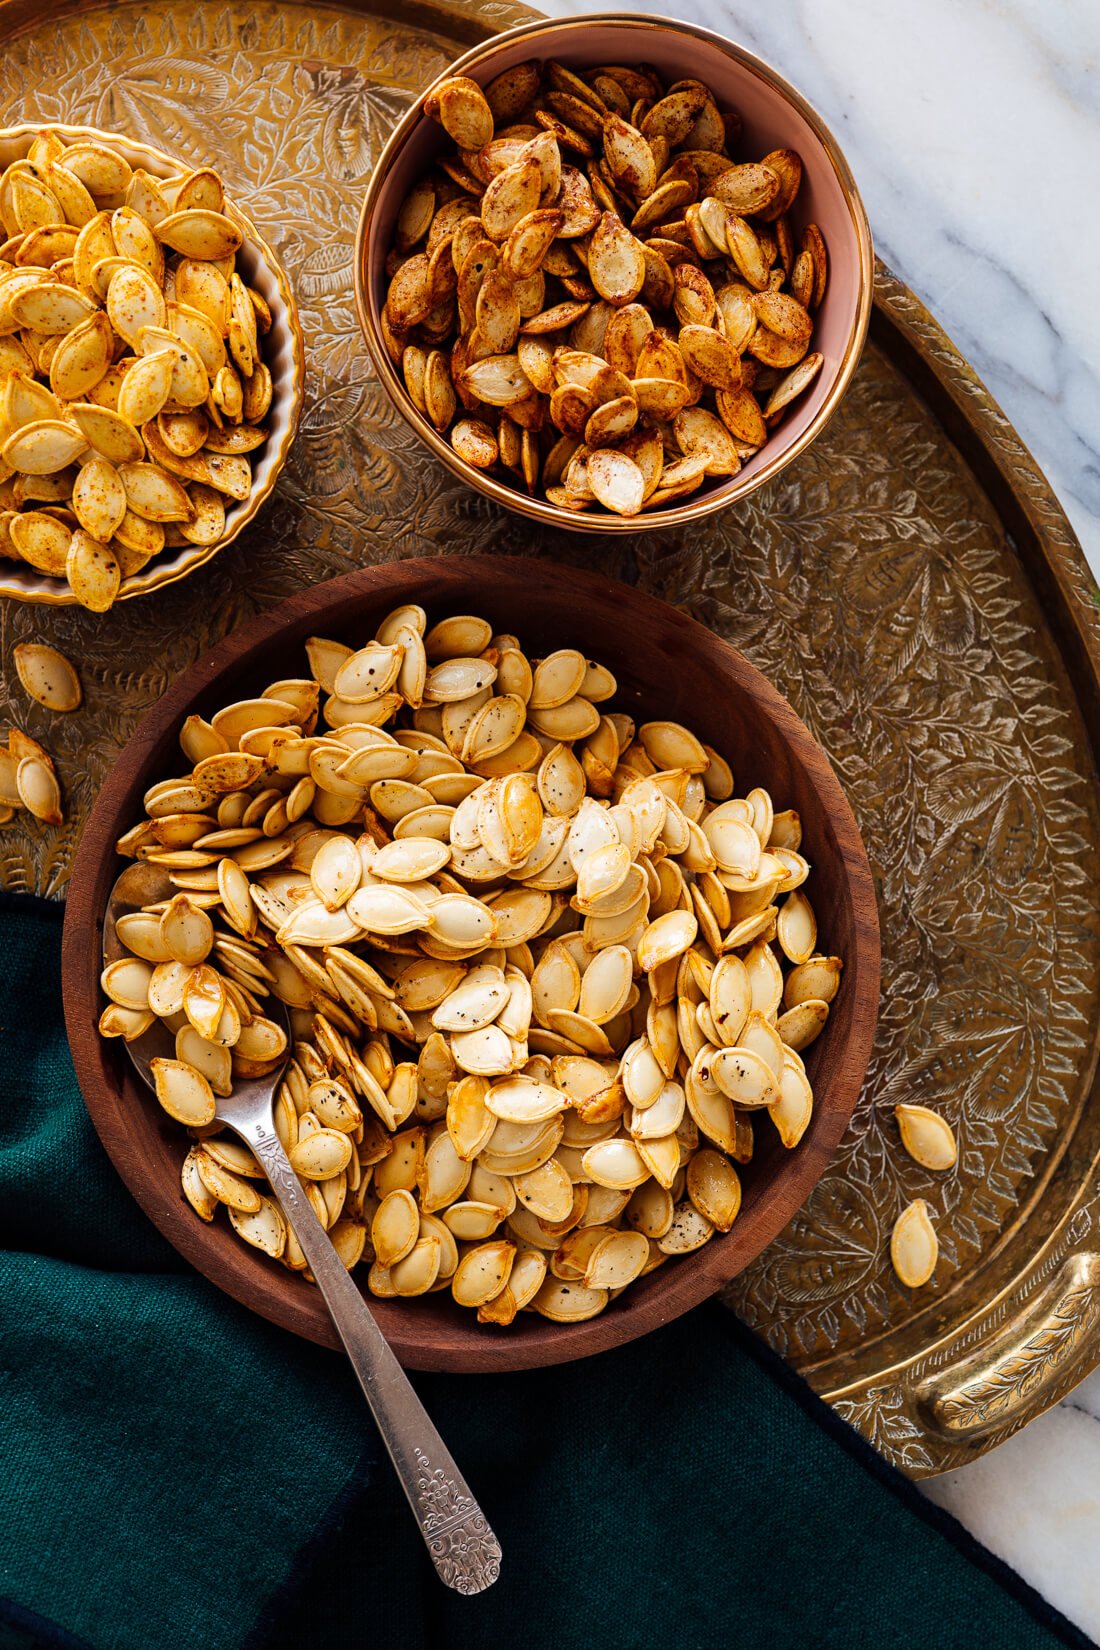
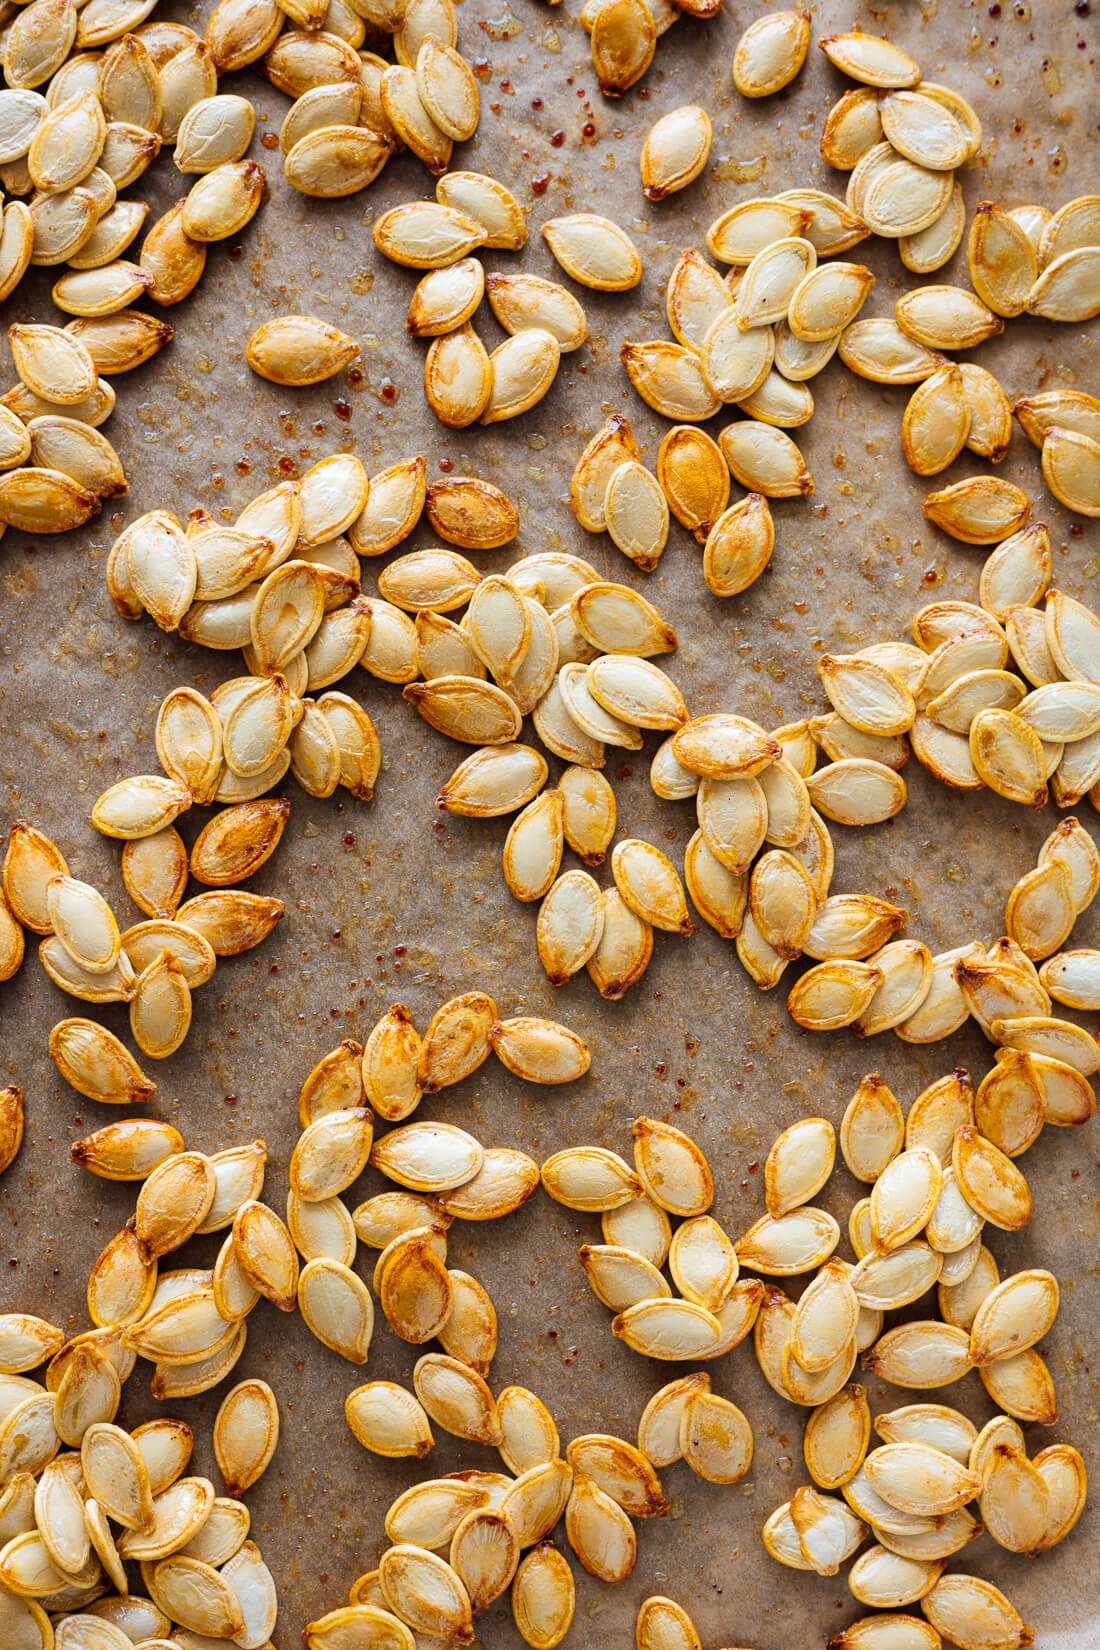
Bake at 425 degrees Fahrenheit, which is high enough to yield toasty results in just 12 to 16 minutes. Stir every 5 minutes to prevent burning. You’ll know the seeds are done when they’re fragrant and lightly golden, as you see in the photos below. Then, stir in spices if you’d like.
Pumpkin Seed Flavor Variations
Choose your ingredients carefully to yield your own fun flavor variation. Here are your options:
- Olive oil or butter: Olive oil provides a more neutral backdrop, while butter makes the seeds taste more like popcorn.
- Maple syrup or honey: Add a bit of either one for some optional sweetness. Delicious!
- Freshly ground black pepper: Pepper is an easy way to add an irresistible, savory note. I think my favorite variation is maple syrup with black pepper.
- Ground spices: For even more flavor, stir in some warming spices once the seeds are out of the oven. I like pumpkin spice blend or ground cinnamon, or golden curry powder (just beware that curry powder will tint your fingers yellow).
Watch How to Roast Pumpkin Seeds
More Pumpkin Recipes to Enjoy
On a pumpkin kick? Let’s do it! Here are more than a few options, or you can view all pumpkin recipes here.
- Pancakes and Waffles: Pumpkin Oat Pancakes (gluten free) or Whole Wheat Pumpkin Pancakes or Pumpkin Spice Waffles
- Quick Breads: Healthy Pumpkin Bread or Pumpkin Muffins
- Savory: Creamy Pumpkin Marinara or Creamy Roasted Pumpkin Soup
- Sweet Treats: Easy Pumpkin Cheesecake Cups or Pumpkin Pecan Scones with Maple Glaze
Please let me know how your pumpkin seeds turn out in the comments. I hope this recipe yields a tasty snack and fun memories.
Perfect Roasted Pumpkin Seeds
- Author:
- Prep Time: 15 minutes
- Cook Time: 15 minutes
- Total Time: 30 minutes
- Yield: 1 ½ cups 1x
- Category: Snack
- Method: Baked
- Cuisine: American
- Diet: Gluten Free
This fun recipe yields perfect roasted pumpkin seeds, every time. You’ll also find tips on how to clean the seeds, plus flavor variations! Recipe yields about one medium pumpkin’s worth of seeds (1 ½ cups).*
Ingredients
- 1 ½ cups fresh pumpkin seeds
- 2 teaspoons extra-virgin olive oil or melted butter
- Optional sweetener: 2 teaspoons maple syrup or honey
- ¼ teaspoon fine salt, to taste
- Optional flavorings: Freshly ground black pepper, to taste, or 1 teaspoon pumpkin spice blend or ground cinnamon or curry powder
Instructions
- To clean your pumpkin seeds: Place the pumpkin seeds in a colander. Run water over the seeds and swish them around, removing any obvious bits of pumpkin flesh along the way. Drain off the excess water. Create a double layer of paper grocery bags (one inside the other). Place the seeds inside with a clean, lint-free tea towel or several paper towels. Fold the bag to close and shake it all around! They should be dry enough at this point.
- To toast your pumpkin seeds: Preheat the oven to 425 degrees Fahrenheit. Line a large, rimmed baking sheet with parchment paper for easy clean-up.
- Place your rinsed and dried pumpkin seeds on the prepared baking sheet. Add the oil, sweetener (if using) and salt. Stir until all of the seeds are coated, then spread them in an even layer across the baking sheet.
- Bake for 12 to 16 minutes, stirring every 5 minutes, until the seeds are fragrant and turning golden. Season them with additional salt, to taste. If desired, season with black pepper, to taste, or stir in the pumpkin spice blend or curry powder. Enjoy.
- Cooled, leftover pumpkin seeds will keep well in a bag at room temperature for up to 2 weeks.
Notes
*Pumpkin seed quantity notes: If your pumpkin yields a bit over or under 1 ½ cups, you should be fine following these ingredients and instructions as written. If it yields significantly less, know that your seeds may finish baking a few minutes earlier, so keep an eye on them. I’m able to fit a maximum of 2 cups on my baking sheet at one time—don’t overcrowd them or they won’t get toasty.
Make it dairy free/vegan: For dairy-free pumpkin seeds, simply use olive oil instead of butter. For vegan seeds, use olive oil and don’t use honey (maple syrup is a great alternative, or skip the sweetener altogether).
Change it up: You can use this technique to roast other winter squash seeds, including butternut, acorn, delicata and spaghetti squash. Since these seeds are typically smaller than pumpkin seeds, they may roast more quickly, so keep an eye on them.

 Vegetable enthusiast. Dog lover. I'm probably making a big mess in my Kansas City kitchen right now.
Frances Bolte
Will this work with butternut squash seeds?
Kate
Yes, it will! Butternut seeds are a bit smaller than pumpkin, if I’m remembering correctly, so they may be done a couple minutes earlier. Just keep an eye on them. Hope they turn out great!
Sadye
I just finished roasting my acorn squash seeds and yes, definitely keep an eye on them — after 7 minutes, they were popping all over. Didn’t burn but definitely ready MUCH faster than the pumpkin equivalents.
Amy
Yes!!!! Best roasted pumpkin seeds of my life! You really have it all figured out for us–drying method, oven temp, timing, seasoning. These are perfect!! Thanks!
★★★★★
Kate
You’re welcome, Amy!
Linda L Tipton
Made these failed mersibley no where near done soggy over salty but will try again next year
Betsy
Helpful instructions for drying the seeds! Beware ever heating olive oil or honey to these temps though – very bad for you. Try coconut oil. It’s delicious!
★★★★
Kate
Hi Betsy! Coconut oil would be tasty here. You might be surprised to hear that quality, true extra-virgin olive oil is safe to heat up to about 420-425. Heating honey is considered unhealthy in the Ayurvedic tradition, but I’ve never found any research to back up the idea. Food for thought. :)
Betsy
That’s great news about olive oil, Kate! I will check my sources. I can find and send the research on honey if you’re interested.
Kate
Please do!
Archi
This was so useful! Great recipe!
Kate
Thanks, Archi! Glad to hear it.
liese
don’t rinse and wash the seeds! you’re missing out on the toasty, crispy delicious bits and they end up tasting like the cardboard ones from the bulk barn. just scoop the seeds out, leaving a good amount of pulp on them, toss with butter/oil/bacon grease etc and roast…
Kate
Thanks, Liese! I’ll try that next time.
Ivory
I love pumpkin seeds. I’ve always wanted to bake some at home, but did not know how. I will be carving pumpkins this weekend, and plans to use your recipe.
★★★★★
Kate
Hope they turn out perfectly for you, Ivory! Have fun. :)
Cynthia
Thanks for the cleaning tips! That’s the hardest part. I like to soak my pumpkin seeds in salty water before I bake them. I don’t use oil when I do it this way. They don’t get quite as brown but they are super tasty and they do get a nice toasty color. We just toasted some seeds from spaghetti squash the other night. And we’ve often toasted delicata squash seeds. I read recently in a cooking magazine that in some countries toasted melon seeds are a thing! I want to try that next time melon season comes around and I’m cleaning and freezing cantaloupe.
Beth
We usually leave bits of pumpkin on the seeds and find that they are yummy when they are baked and crunchy. We love the idea of pepper and maple syrup, can’t wait to try!
★★★★
Kate
I hope you love them, Beth! Thank you for your review.
Mauricio Corleto
In México ground pumpkin seeds is called “pepita”and is used as spices on different recipes.
Kate
Hi Mauricio, Thank you for your comment and sharing. Yes, I use them quite often in several recipes, delicious!
Sadye
I wasn’t skeptical of the paper-bag method, but I was very curious because I hadn’t heard of it before — happy to say it delivered! The sheet on the lower rack of the oven was perfect at 12 minutes, the top shelf took just a bit longer. Easy peasy and a fun way to spend some time with a buddy!
★★★★★
Kate
Thank you, Sadye! I’m glad it worked for you. :) Happy belated Halloween!
Susan
Every year a try to roast my pumpkin seeds with a different variety of seasonings. These were by far the best! Never thought of putting a bit of sweetness to them. My 8 year old couldn’t get enough of them. Thanks so much for the recipe!
★★★★★
Kate
Hooray! Delighted to hear it, Susan. Thank you for your review!
Carol
You can also use Grapeseed Oil. It has a higher heat tolerance the olive. I use cumin, chili powder, cayenne, and salt.
★★★★★
Emily
The texture of the seeds was a little tough but I am not sure there is a way to fix that with any recipe.
★★★
Kate
I’m sorry to hear you didn’t love this one. I appreciate your feedback. How long did you roast them for?
Emily
Right at 16 minutes.
Andrea Miller
Thank you for the recipe!!
My seeds were done in under 10 minutes and I stirred them at the 5 minute mark. I used butter and maple syrup. The seeds were nice and crispy but the coating burned a bit. (I only cooked a small amount to test the different combinations!).
Do you recommend I turn my temp down or maybe stir them sooner and keep an eye on them? My oven tends to run hot so I had it at about 415 to begin with. Thanks in advance! Can’t wait to try more combos!
~Andrea
★★★★★
Celine
I agree! I think it’s the hulls. I find them kind of hard to chew too. But the flavor’s delicious.
★★★★
Donna
A pinch of garlic powder beside of black pepper and curry powder, it smells awesomely good around my house.
★★★★★
Nancy Jacobson
Hi Kate. Just making your roasted pumpkin seeds after baking pie pumpkins for our Canadian Thanksgiving.
Thought you might like to try a tip I came across years ago for Halloween jack’o lanterns. Instead of cutting a lid from the top, cut a hole in the bottom and you can easily set the candle inside to turn on each night.
★★★★★
Karen Costello
I am just putting a pan of seeds in to bake.. thank you for your tips and recipe. I have always washed and dried as best possible and then poured prepped seeds into a bowl to add olive oil, salt, honey snd a smidgeon of pumpkin seed spice. Then distribute onto cooky sheet covered with parchment. My hubs of 50 years asks each year…. Is it time??? Lol. Karen
Lora
I just made a small batch from a pie pumpkin to test the method before we have family pumpkin carving and this is by far the easiest method. I roasted them in the toaster oven and they are perfect. Thank you!
★★★★★
Kate
You’re welcome, Lora! Thank you for your review.
Charlie
We just baked our pumpkin seeds with this recipe and we are in love! The taste is amazing .
★★★★★
Kate
That’s great to hear, Charlie!
Amy Milbrandt
This recipe was so helpful!!! Thank you!! I did one batch with pepper, olive oil, and garlic salt. And another with butter, salt, and cinnamon and sugar. YUM!!!
★★★★★
Kate
I’m glad you loved them, Amy!
Tiffany
This did not work out well for me! Followed recipe as written- set timer for 5 minutes and stirred, then set again for 5 minutes and in that time my parchment paper turned black, flaky, almost all of my seeds were burnt! Opened the oven to a huge cloud of smoke! I don’t usually use parchment paper but did this time- turns out the box actually says not to use in oven over 400 degrees. Yikes!
★
Kate
Hi Tiffany, I’m sorry that was your experience! Where did you have your oven racks placed? I tested this several times without that happening and use parchment with many other recipes at the same temperature.
Russa Waldren
Perfect recipe, thank you! My seeds roasted beautifully. I used spray extra virgin olive oil with a little trepidation, but they came out great anyway.
I’ve never tried sweetened seeds, so I made a small batch using Mike’s Extra Hot Honey. Oh My Gosh, so good! Might go get another pumpkin just to make more.
★★★★★
Kate
I’m glad you enjoyed it and that it still turned out! I appreciate you sharing, Russa.
Rachael Norby Schwieger
I have been trying to make roasted pumpkin seeds for probably30 years now and these are the most “perfect” I have tried. What inspires me to comment is the method of removing the nasty pumpkin goop. That is really disgusting to me and puts me off the whole experience. I tried your method with the towel and bowl and I was amazed that it worked so well. I removed the large pieces of pulp first but other than that it was all your magic method. Thank you for enlightening me after all these years. You can teach an old dog new tricks. We spiced ours with Tajin seasoning. They were really tasty.
★★★★★
Kate
Hooray! I love to hear that, Rachael.
Ken
When my kids were young they always carved pumpkins and I would save the seeds and put them in the refrigerator to roast “later.” Half the time they would get moldy and I had to throw them away and the other half of the time when I did get around to roasting them, they would usually burn. I used your recipe this year and they were perfect. I only used EVOO and sea salt and most were eaten while the pumpkin muffins were in the oven.
★★★★★
Thom Tee
Fannnnnntastic! My pumpkin was a bit larger… around 30 pounds. Entire batch of seeds on a single lipped cookie sheet and an extra 8 minutes. Olive oil and maple syrup with salt before roasting, a little more salt, pepper and a wee bit of cinnamon afterwards. I went heavy on the maple syrup (apparently) but the taste was excellent… they just needed a good bag-shake after roasting to separate.
Great recipe…simple.. easy… delicious. Thank you.
Kate
I’m glad you loved it, Thom! I appreciate your review.
Stephanie
Followed this recipe and they turned out great! My only question is do you have any tips for not having seeds pop all over your oven? I may have roasted mine too long (they still turned out delicious!) but I heard them popping and when I pulled them out, a lot had popped off the baking sheet onto the bottom of the oven. Not a huge deal but wondering if there is a way to avoid having to clean them off the bottom of the oven after – thanks!
Kate
Oh no! It sounds like your oven may be a little warm. Try adjusting the time and see how that goes!
Connie Roth
Easy and delicious!!
★★★★★
Kate
I’m glad you enjoyed it, Connie!
Cindy
I think 425 is too high. I stirred at 5 min. and they were popping all over the oven and were burned at the 10 minute mark. I should have kept a better eye on them. I cooked them without washing, I did remove as much of the guts as I could. I used coconut oil and salt only. Next time I will try at 400 and keep a better eye on them.
Kate
Hi Cindy, I tested these several times and didn’t have issues. But, ovens can vary some. You can try to decrease the time in the oven.
Leigh
I followed the instructions but they started popping around 8 minutes in! Is that meant to happen, or does that mean they’re cooked? I tried them once I’d pulled them out and they didn’t seem to have any substance to them. What should I do differently next time?
And are you meant to open them to eat them (like sunflower seeds with their husk on?
Kate
Hi, Did you stir them every 5 minutes?
Leigh
Yes, after the first stir I put them back in and then they started popping not long after that.
Kate
I’m sorry to hear that. Does your oven tend to run warm?
Lorraine
Thankyou for this recipe and instructions. The acorn and spaghetti squash seeds turned out great. I used 2tbs butter, salt, and pepper. Yummy.
Lisa
I’d like to roast a few pumpkins worth of seeds, using different flavours. What is a good way to store these? Do you recommend refrigeration?
Kate
Hi Lisa, see step 5 – Cooled, leftover pumpkin seeds will keep well in a bag at room temperature for up to 2 weeks.
Honest Jane
Followed instructions to a T and they burned. Thanks.
★
Kate
Hi, I’m sorry to hear that. Does your oven tend to run hot? Do you have a convection or conventional oven?
Linda
I love your vegetarian recipes, own your cookbook but I don’t understand why you suggest mixing olive oil on top of parchment on a cookie sheet. I have several shallow wide metal bowls ( very inexpensive at Asian shops) that I use for coating veggies with oil. I find it both easier & quicker, wastes less oil, and easy to clean up. I just rinse the bowl with hot soapy water & set it on top of the stove to dry while the oven is baking.
★★★★★